View our Pricing & Plans for a detailed list and comparison of features available in each plan.
Our contract automation solution will optimize your process and cover all your contract stages from creation to signing. Start with a blank document to create a contract from scratch, use your existing contract document, or use our contract templates.
Before You Begin
- You can only invite members who are in the same workspace as your contract to collaborate on it.
- As the creator of the contract you are the one in charge of approving or denying suggestions, as well as moving the contract to a new stage.
- “My Team” is the team on which you are, which could be either the issuing or receiving team.
- The issuing team drafts, collaborates, and issues the contract; They can also negotiate, approve, and sign it.
- The receiving team may negotiate, approve, and sign the contract.
Contracts Tab
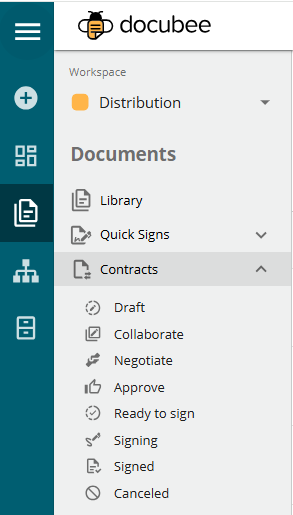
In Docubee’s left navbar, click Documents | Contracts to open the Contracts tab. It includes the Overview and Reports tabs. Always ensure you have selected the correct workspace using the workspace selector at the upper-left corner.
Overview Tab
Access all your contracts in one location. Search for contracts by name, add new ones, and perform various actions using both the quick access buttons and the More Actions menu.Note: Signed contracts are stored in your Repository and also accessible at Documents | Contracts | Signed.
Search and Filter Contracts
Search for contracts by entering a query in the search bar or filter the list of contracts by date, tags, and metadata.
Note: To delete all the filters, click Clear Filters (visible after the Metadata filter dropdown only if a filter has been set).
Date
- Click the Date dropdown and select one of the following:
- Any Time
- Created On
- Last Modified
- Expiration Date
- Renewal Date
- Cancelation Date
- In the date picker, select a single date, or select a date range by clicking a start date and an end date.
- Click Apply.
- The contracts are filtered by the specified date(s).
- Click the Tags dropdown.
- Select the checkbox preceding the tag and click Apply Filter. Note: Click Clear to clear all checkboxes.
- The contracts are filtered by the specified tag(s).
- Click the Metadata dropdown to open Filter by contract metadata values.
- Filter by:
- When all of these are true
- When any of these are true
- To set a filter:
- Select the metadata field to use in the condition from the dropdown.
- Select the relational operator to use in the condition from the dropdown, either equals or contains.
- Enter the value to compare in the condition.
- Click Add Filter to add another filter (up to 10 total), specify a metadata condition, and click Apply Filter(s). Note: To delete a filter, click the X at the end of a metadata condition. Note: To remove all metadata conditions, clear Clear.
- The contracts are filtered by the specified metadata values.
Quick Access Contract Actions
A quick access contract action icon is provided depending on your contract’s stage. This along with the rest of the contract actions are in the Contract More Actions shortcut menu.| Contract Stage | Quick Access Contract Action | ||
| Edit Contract
|
Send for Signature
|
View Signing Information
|
|
| Draft | ☑ | ||
| Collaborate | ☑ | ||
| Negotiate | ☑ | ||
| Ready to Sign | ☑ | ||
| Signing | ☑ | ||
| Signed | ☑ | ||
More Actions Menu
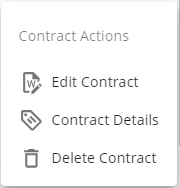
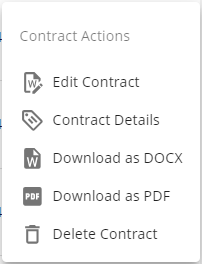
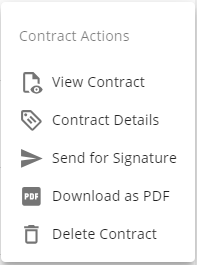
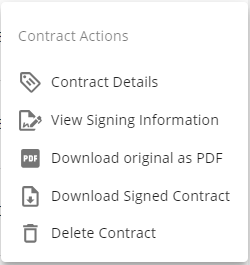
In Documents | Contracts, click the More Actions icon (three vertical dots) on any contract. This opens the Contract Actions menu, showing actions you can perform from the Contracts page. The Contract Actions menu includes several actions. The available actions vary according to your contract’s current stage:|
Contract Stage |
Contract Actions Menu |
||||
 |
 |
 |
 |
 |
|
| Draft |
☑ |
☑ |
|||
| Collaborate |
☑ |
||||
| Negotiate |
☑ |
||||
| Ready to Sign |
☑ |
||||
| Signing |
☑ |
||||
| Signed |
☑ |
||||
Contract Actions
Note: The Download as DOCX and Download as PDF actions allow you to download the negotiated contract in their respective formats without any signing information, regardless of the progress made in signing.
Edit Contract
Opens the contract in the Contract Editor.Note: This action is not available for signed contracts.
View Contract
Displays the prepared contract that is ready to sign.Contract Details
Displays contract details including metadata and tags without having to be within the Contract Editor.Send for Signature
Sends a contract that is ready for signature.Cancel Signing
Cancels signing when the participant declines to sign on receiving a contract for signature.View Signing Information
Displays which recipients have viewed and signed the contract after it has been sent for signature.Track Your Contracts
You can monitor your contract's progress through its stages and the signer’s status.- This action opens the right-side panel that shows your contract signing information: title, progress bar, list of recipients, and their states.
- You can view the signers progress and information.
- You can preview and/or download the contract using the Preview Document and Download Document buttons, respectively.
Download as DOCX
Downloads the contract document in its current state of collaboration (edits and comments) to your computer as a DOCX.Download as PDF
Downloads the contract document in its current state of collaboration (edits and comments) to your computer as a PDF.Download Original as PDF
Downloads the original contract document to your computer as a PDF.Download Signed Contract
Downloads the final and signed contract document to your computer as a PDF named Final Document.PDF.Delete Contract
Deletes your contract after you confirm your intent.Contracts Actions by Stages
| Contract Stages | |||||||
| Actions Available | Draft | Collaborate | Negotiate | Ready to Sign | Signing | Signed | Canceled |
| Edit Contract | ✓ | ✓ | ✓ | ||||
| Download as DOCX | ✓ | ✓ | ✓ | ✓ | ✓ | ✓ | ✓ |
| Download As PDF | ✓ | ✓ | ✓ | ✓ | ✓ | ✓ | ✓ |
| Delete Contract | ✓ | ✓ | ✓ | ✓ | ✓ | ✓ | |
| View Contract | ✓ | ||||||
| Send for Signature | ✓ | ||||||
| View Signing Information | ✓ | ✓ | ✓ | ||||
| Cancel Signing | ✓ | ||||||
| Download Signed Contract | ✓ | ||||||
Create a New Contract
- Login to Docubee.
- On your dashboard, navigate to Documents and click Contracts.
- At the upper-right corner of your screen, click the New button and select Create Contract from the menu. Note: If you have not created any contracts as yet, you will see the Create New Contract button in the middle of your screen.
- In the Create new contract modal, enter a name for the contract. The contract name will be displayed in the contracts list and the contract editor.
- Switch the Start with a blank document toggle on/off to decide if you want to start with a blank document or upload one. Note: The Start with a blank document toggle is enabled by default. You will have an empty DOCX file to start creating a new contract. Turn off the Start with a blank document toggle to avail the following contract document options: - An existing contract document - Use the module below to upload an existing contract document from your local files. - One of our contract templates - Use the module below to select one of our contract templates to use as a base for your contract. Modify it in the contract editor to suit your specifications.
- Click Create.
- The contract editor opens with a right-side panel of the various stages.
- Prepare your contract by adding your content in the document. Note: If you had loaded an existing contract document instead of creating a new one, you would be editing it here.
- On the right-side panel, next to Collaborate, click the Start button. Note: If you do not need to collaborate, skip ahead to the next step.
Note: Clicking the Share button will display the Draft modal. Although you cannot add members at this stage, you can advance to the Collaborate or Negotiate stage and then add members.
See Starting Points to Add a New Document for information on another way to initiate creating a new contract.
Collaborate
- In the Collaborate modal you have the My Team section that lists you as owner and allows you to add collaborators to your contract. The dropdown list displays the members in your workspace. Note: While in the Collaborate stage, you can open this modal by clicking the Edit button in the right-side panel under Collaborate. This will allow you to remove or add collaborators at any time during this stage.
- Click Add to my Team. Select a participant and click Add. Repeat for additional participants you want to add. Note: By default, participants can view the document. You can assign additional permissions per participant by selecting the checkboxes for Suggest changes and Edit document. Note: You can remove a participant by clicking the trash can icon at the end of the member information in the Collaborate modal.
- Click Save. The right-side panel under Collaborate displays participant summary with email and permissions.
- Collaborators/participants will receive an email invitation to collaborate on your document.
- They will click on the View Document button in the email to collaborate on your document.
- The participants that accepted the invitation to collaborate can view, edit and/or comment (based on the permissions granted) on the document.
- When the document is ready to share with external participants for negotiation, on the right-side panel, next to Negotiate, click the Start button.
- You are prompted with a message that you are completing this stage and moving to the negotiating stage, and will not be able to return to the collaborate stage. In the negotiate stage, you can continue editing the document and will have other participants outside your workspace in your document. Note: All collaborators maintain their assigned permission during the negotiation stage.
- Click Continue to Negotiate.
Negotiate
- In the Negotiate modal, a Receiving Teams section is now available in addition to the My Teams section.
- Click Add to Receiving Team, enter the email of the person to invite for negotiations, click Add.
Note: By default, participants invited to negotiate can view the document. You have to assign additional permissions by selecting the checkbox for Suggest changes. They cannot edit.
Note: You can remove a participant from any section by clicking the trash can icon at the end of the member information in the Negotiate modal.
- Negotiators will receive an email invitation to negotiate on your document.
- They will click on the View Document button in the email to review and negotiate on your document.
- Participants invited to negotiate can view and suggest changes (based on the permissions granted) in the document.
- When negotiations are complete and the document is ready to sign, on the right-side panel, next to Sign, click the Start button. Note: If you have any open/unresolved comments or suggestions in your document, you are prompted with a message informing you of it. Click Return to Document to go back to your document and resolve them.
- You are prompted with a message that you are completing the negotiate stage, moving to the signing stage, and will no longer be able to edit the document. Note: All participants' links to view/edit the document will become nonfunctional.
- Click Continue to Signing.
Approve
- Click Share to open the Approve modal, your team and receiving team members are displayed.
- Modify the Approve permissions and add more participants to each team. Note: The contract creator can add approvers to teams. Note: All approvers with Approve permission can approve or undo the approval for that team.
- Click Save.
- In the right-side panel’s Approve section, review the contract and click Approve For My Team to submit your approval if you are the approver. Note: The Approve For My Team button will be disabled if you are not the approver.
- You are informed that the other team will be notified of your approval, another approver on your team can undo your approval, and when both teams have approved the contract automatically moves to the signing stage. Since the contract is completed, document editing and suggesting will conclude. Note: Click Go Back next to Negotiate to return to that stage. Note: If the issuing team moves the contract back to the Negotiate stage, all approvals will be undone and all teams will need to approve again. Note: Notifications are in-app and via email.
- From the Contracts dashboard, send it for signature.
Undo an Approval
- In the right side panel’s Approve section, click Undo Approval for My Team or Undo Approval for Receiving Team to revert the approval.
- The other team is notified that you are no longer ready to proceed. When the contract is ready for approval again, a team member with approve permission can reapprove it.
Sign
- In the Ready to Sign modal, your team and receiving team members are listed and you can set permissions for those who sign and receive the finalized document. Click Save. Note: You can add more participants, if required.
- In the right-side panel’s Sign section, click Send for Signature.
- The Fill or Sign modal opens for your contract with the Send & Sign option selected and all the recipients’ and signers’ information prefilled. Note: You can select the gear icon by each participant to add additional actions, additional security parameters and create a customized email.
- Click Continue.
- In the Prepare Document modal, click and drop into your document the signature and/or other fields, as required. For more information on configuring fields see Preparing a Document.
- At the upper-right corner, click Send for Signature. Note: you will be prompted with a message if you have not added any fields for a participant you have selected to sign the contract. You can click Go back and add fields to do so.
- In the Finalize Document modal, you can review/modify the general settings and set an expiration date. Click Send Now.
- Participants will receive an email about a document to review and sign. They can click the Review Document button to act on it.
- You are back on the Contracts page with the right-side panel showing your contract information.
View Version History
The contract’s version history is an iterative record of the dates the version was edited and the changes. A version is created every five minutes. Access it in the contract editor. In the version history’s right-side panel, you can:- view any version of the contract
- revert to a previous version
- review contract revisions in a single panel
- compare revisions in side-by-side panels
- At the upper-right corner of the contract editor, click the Version History button
 .
. - The right side panel will display the list of dates and times of the various versions.
- To view a specific version’s history, select the version to view.
- A read-only version of the document showing the formatting and text changes will be displayed. Traverse the changes of that version.
- To revert to a previous version, select the version and click Restore this version
 .
Note: To ensure that the current version’s contents are not lost, a new version will be created with it before replacing it with the contents of the version to be restored.
 - To see the differences between the selected version and another version:
- Turn on Show differences with.
- From the dropdown, select the version to compare against.
- The differences will be highlighted in a comment to the right of the contract.
- To compare the selected version and another version side-by-side:
- Turn on Show side-by-side comparison.
- From the dropdown, select the version to compare against.
- Two side-by-side panels will display each version, allowing for comparison.
- Click Return to Current Version to return to the contract editor.
Send Messages (Discussion)
In the collaborate and negotiate stage of contracts, participants can send messages to internal and external parties to discuss changes without leaving the application. The issuing team can send internal or public messages, while the external receiving participants can send public messages.- At the upper-right corner of the contract editor, click the Discussion button
 .
. - The right-side panel will display the following:
- Contract’s message history, which includes the message, date and time, and whether it was internal or external. Note: Use Delete message (trash can icon) to delete a message from the message history.
- Message box, where you enter the message, select Public or Internal, and click send (arrowhead icon) or press Enter on your keyboard.
- At the upper-right corner, click the Discussion button to close it.
Manage Contract Details
The Contract Details modal has predefined metadata fields and your tags. Metadata and tags can be used to search and filter contracts.- At the upper-right corner, click the Contract Details button
 .
. - In the Contract Details modal, manage the contract metadata and tags.
Metadata Fields
These are predefined metadata fields where you enter values that are associated with the contract. This allows for searching by contract values in addition to filtering by tag. To add a contract value:- In the Contract Details modal, enter values for the metadata fields.
- Click Save.
Tags
Tags are arbitrary text strings that you can associate with your contract to categorize contracts and make them easier to find. It can be used to filter contracts. You can add up to 100 tags. To add a tag:- In the Contract Details modal, enter a tag term and click Add.
- Click Save.
- In the Contract Details modal, click the X next to the tag to delete.
- Click Save.
Share Permissions
Use the Share button at the upper-right corner of the contract editor to open a modal for the current stage. The modal’s title varies based on the stage you are on. The modals will have the My Team and/or Receiving Team, based on the stage.
Note: Based on the stage, the teams available in this tab vary.
The modal lists the teams, members, and their permissions.
Add a person to the team issuing the contract, My Team (assuming you are on the issuing team):
- The Draft and Collaborate stages will have only the issuing team, My Team.
- Negotiate, Approve, Sign stages will also include the receiving team.
- Under My Team, click Add to My Team.
- Use the dropdown to select a workspace member available to add and click Add to add them to the team.
- Modify the permissions.
- Click Save.
- Under Receiving Team, click Add to Receiving Team.
- Type an email address.
- Modify the permissions.
- Click Save.
| Stages -> | Draft/Create | Collaborate | Negotiate | Approve | Sign |
| Teams | Issuing team | Issuing team | Issuing team & Receiving team | Issuing team & Receiving team | Issuing team & Receiving team |
| View (default for all members) | Y | Y | |||
| Suggest changes | Y | Y | N | ||
| Edit document | Y | N | N | ||
| Approve | Y | ||||
| Sign | Y | ||||
| Receive copy | Y | ||||
| Add members | N | Y | Y | Y | |
| Remove participant | Y | Y | Y | Y | |
| Return to this stage | N | Y | N | ||
| Return to previous stage | N | N | Y | N |
Known Limitations
- Six participants can be involved in contract collaboration.
- Six participants can be involved in contract negotiation.
- Six participants can be involved in contract signing.
- This is a “Contact Us” feature. A Docubee customer support representative must enable the flag for a given organization.
Related Information
Overview of the Documents Section Contract Automation with Docubee (Video) Effective Contract Collaboration from Docubee (Video) Additional Resources Need more help getting set up? Contact us for assistance from our customer support team or register for Office Hours.Was this article helpful?
That’s Great!
Thank you for your feedback
Sorry! We couldn't be helpful
Thank you for your feedback
Feedback sent
We appreciate your effort and will try to fix the article