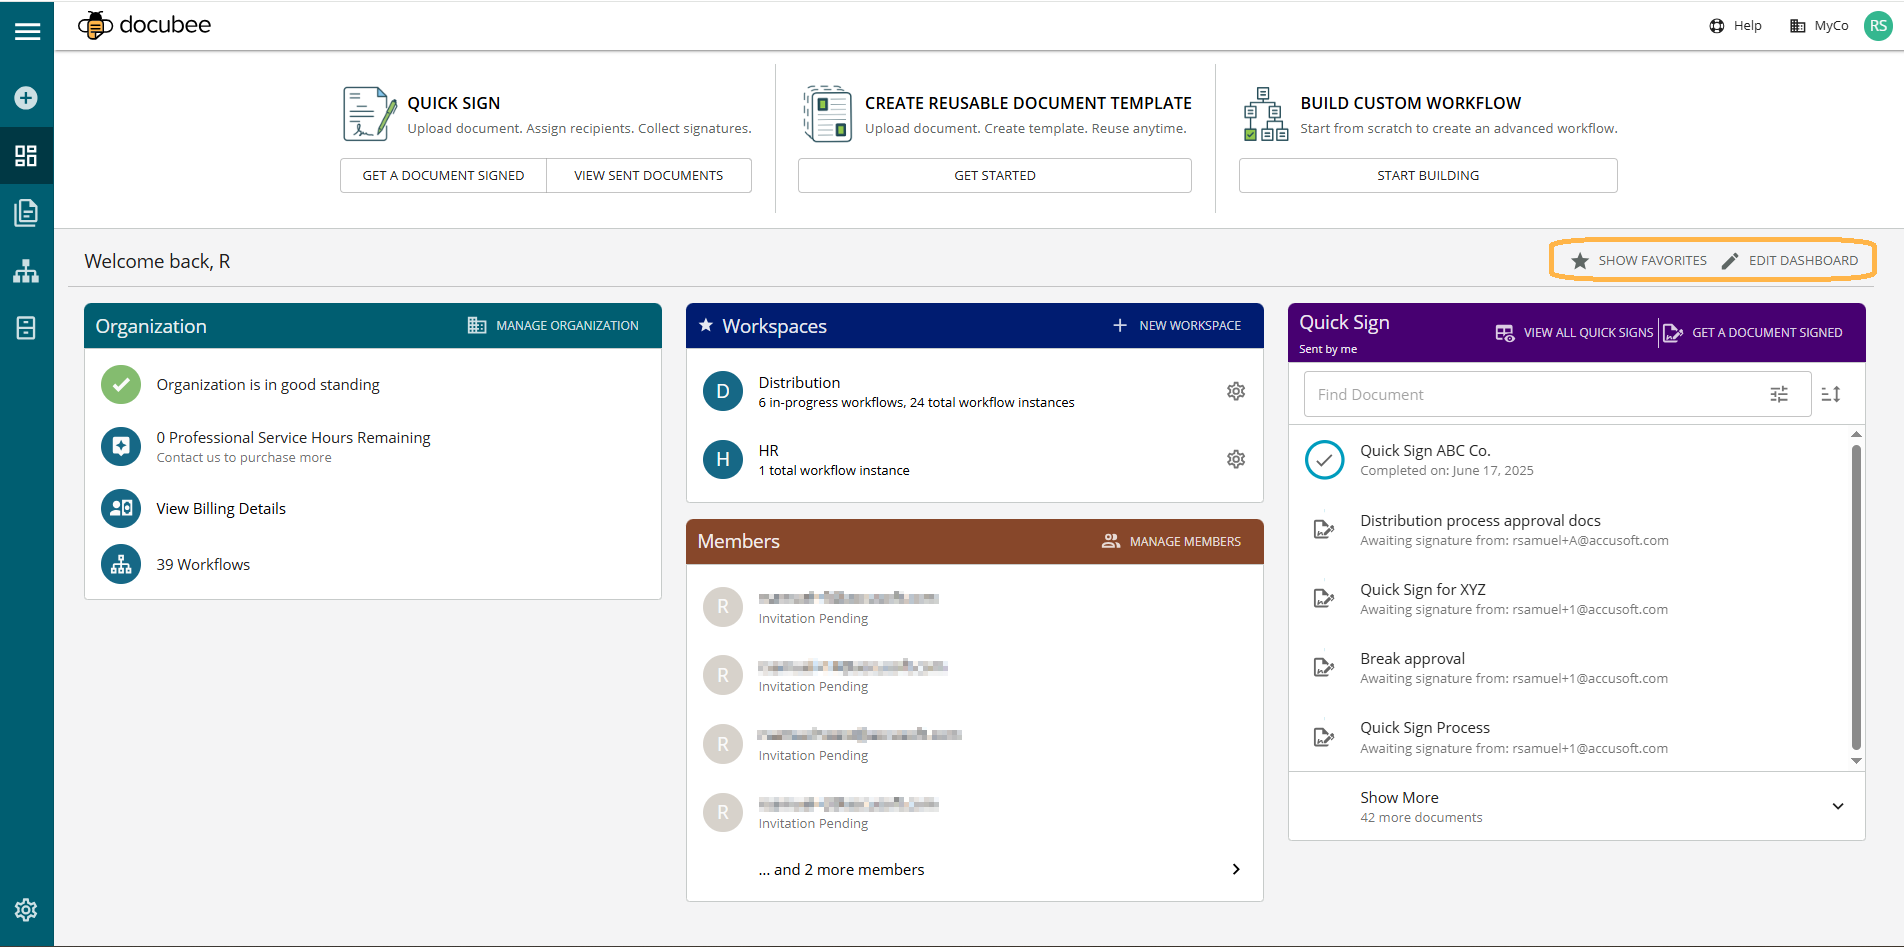
You can customize your Docubee dashboard! The Edit Dashboard button opens the dashboard editor where you can customize modules, layout, and show/hide the top quick access buttons.
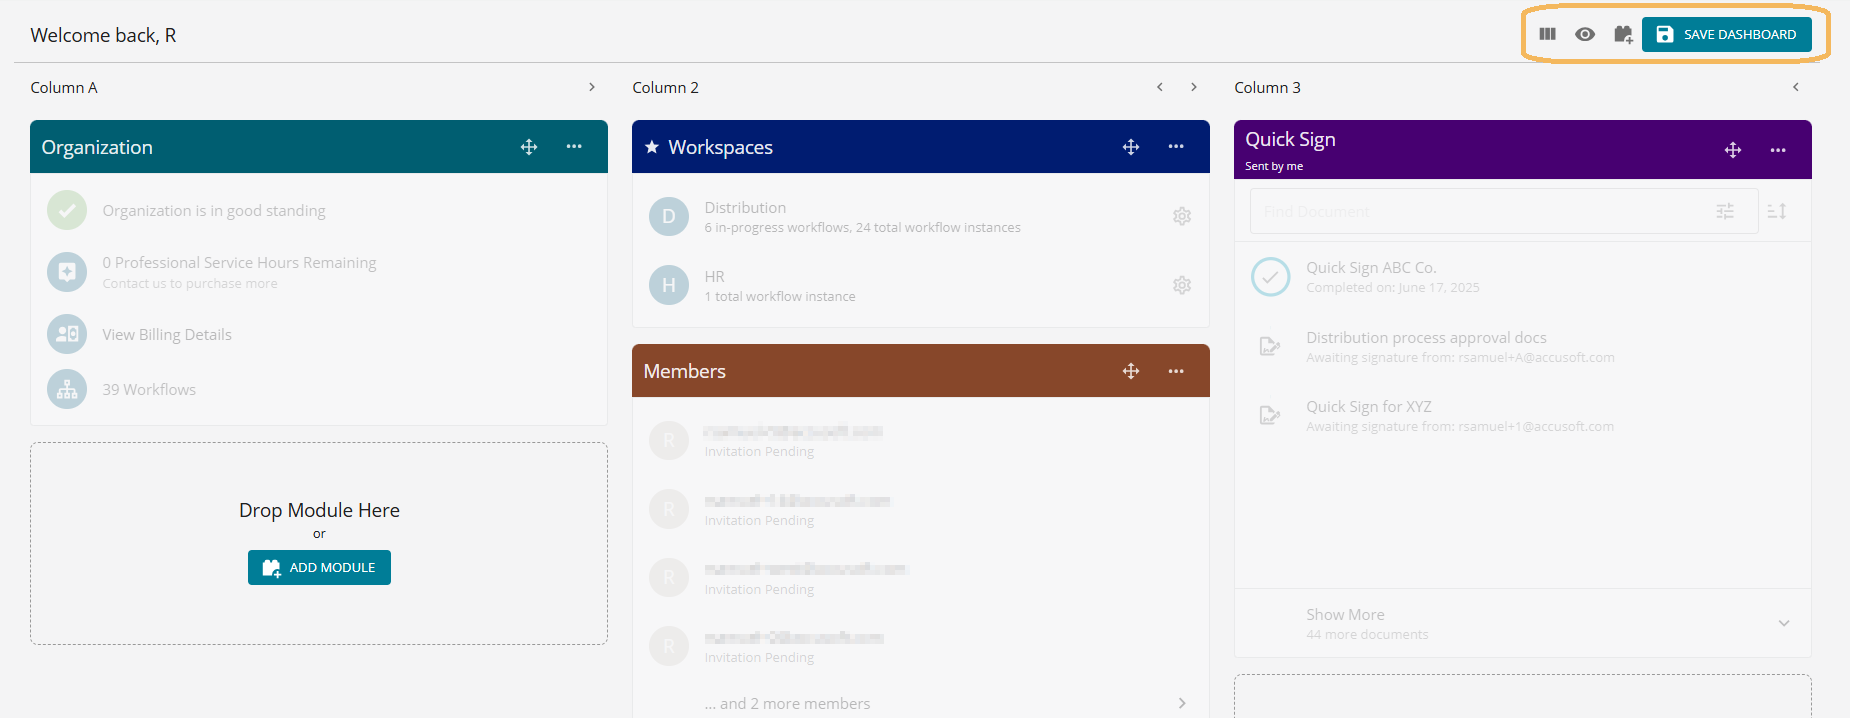
Modules are on the lower section of your dashboard and you can customize that area to suit your specifications. You can choose to see all or only favorite modules, add modules, reorder modules, remove modules, customize modules, and adjust layout. See Modules for information.
 See Overview of Your Docubee Dashboard for more information and how to access a tour of the dashboard.
See Overview of Your Docubee Dashboard for more information and how to access a tour of the dashboard.
Modules
You can add and customize modules for Organization, Members, Workspaces, and Quick Sign. Click within the modules to explore their possibilities!Note: You can either add modules using the Add Module icon in the toolbar or the Add Module button in the modules panel.
Each module can be customized with a different header color for easy identification, added to favorites for quick access, and removed from the dashboard when no longer required. Quick Sign modules additionally include Module Settings for further customization.
Note: Each module can have one occurrence on the dashboard with the exception of the Quick Sign module.
Modules:
- Organization
- Displays the organization’s details.
- Use the Manage Organization button in its header for quick access to the organization settings.
- Members
- Displays member details.
- Use the Manage Members button in its header for quick access to the member settings.
- Workspaces
- Displays all your workspace details.
- Use the New Workspace button in its header to create a workspace.
- Quick Sign
- Displays the most recently sent Quick Sign documents.
- Use the View All Quick Signs button in its header to view all your Quick Sign processes in Documents Quick Signs.
- Use the Get a Document Signed button in its header to initiate a Quick Sign process.
Show Favorites
By default, all modules are displayed on your dashboard.- To view only the modules starred as favorites, click Show Favorites. Note: Add a module to favorites for it to display when you click Show Favorites.
- To revert to viewing all modules on the dashboard, click Show All.
Edit Dashboard
- Click the Edit Dashboard button to open the dashboard editor.
- You can customize your dashboard in the following ways:
- After making your customization settings, click Save Dashboard to apply the changes.
Adjust Layout
You can adjust the layout of the columns on your dashboard.- Click the Edit Dashboard button to open the dashboard editor.
- Click the Adjust Layout icon
 to open the modal.
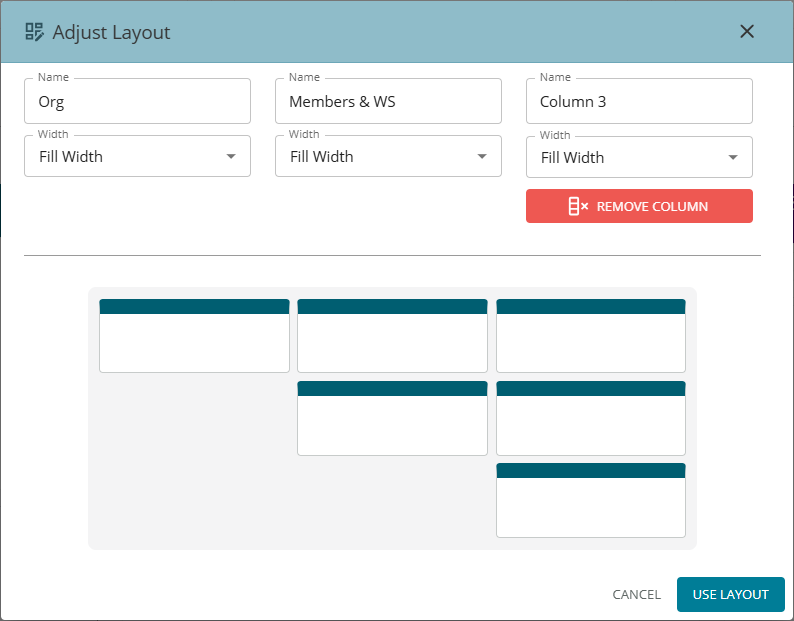
- Enter the following:
- Name - Enter a name for the top of the column.
- Width - Set the column width by selecting from the dropdown: Small, Medium, Large, or Full Width. Note: This setting is useful and effective only when you have one or two columns.
- To remove a column, click Remove Column at the bottom of a column to delete.
- To discard modifications made to the layout, click Cancel.
- After making the layout adjustments, click Use Layout to save the changes and apply the updated layout to the dashboard.
Hide/Show Quick Access Buttons
You can either display or hide the top quick access buttons on the dashboard.- Click the Edit Dashboard button to open the dashboard editor.
- Do one of the following:
- Click the Hide quick access buttons icon
 to hide the top section of the dashboard that displays the quick access buttons.
- Click the Show quick access buttons icon
 to reinstate the quick access buttons on your dashboard.
- Click the Hide quick access buttons icon
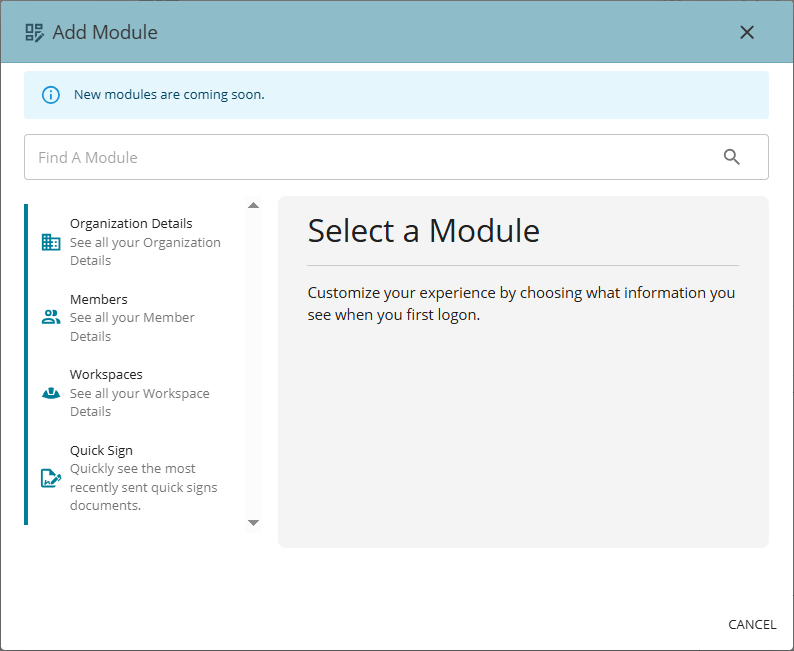
Add Module
To add a module:- Click the Edit Dashboard button to open the dashboard editor.
- Click the Add Module icon
 to open the Add Module modal.
 Note: Alternatively, you can click Add Module within the Drop Module Here or Add Module dotted boxes. See Add Module Button for information.
 - On the left, select a module to add.
- Click Add Module. Note: If you have already added the module (with the exception of Quick Sign), the lower-right button will indicate Already Added.
Quick Sign Module Settings
Configure the Quick Sign module to suit your specifications, with each module displaying a maximum of 1000 Quick Sign processes. It is a customized filtered Quick Sign module.- Click the Edit Dashboard button to open the dashboard editor.
- Click the Add Module icon to open the Add Module modal.
Note: Alternatively, on the QS module click More (ellipsis icon) and then Module Settings.
- From the list of modules, select Quick Sign.
- Click Configure Module to open the Configure Quick Sign modal.
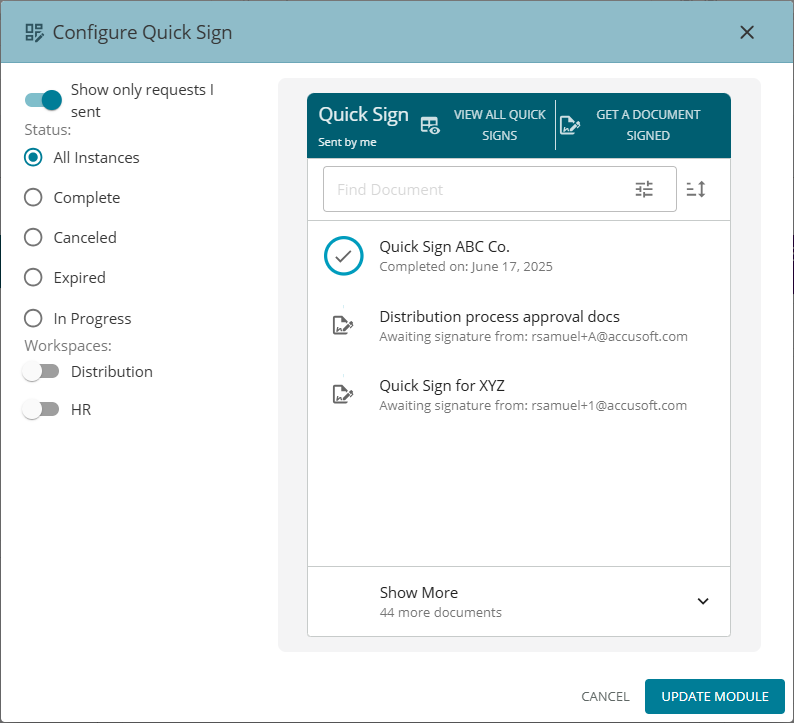
- Set the following to filter the Quick Sign documents:
- Show only requests I sent - Use the switch to turn this setting on/off.
- Status - Choose the status of the Quick Sign processes to display in the module: All Instances, Complete, Canceled, Expired, or In Progress.
- Workspace - Choose the workspaces for which the Quick Sign processes should display in the module.
- Click Update Module to save and apply the configuration.
- Click Save Dashboard.
Reorder Column
To reorder a column:- Click the Edit Dashboard button to open the dashboard editor.
- Click the right arrow > or left arrow < beside the column name to move a column to the right or left.
Reorder Module
To reorder a module:- Click the Edit Dashboard button to open the dashboard editor.
- Click and drag the reorder module icon
 present on each module.
 - When dragging the module, drop it at any of the Drop Module Here or Add Module dotted boxes. Those are designated module positions.
Add Module Button
To add a module:- Click the Edit Dashboard button to open the dashboard editor.
- Click Add Module in the Drop Module Here or Add Module dotted boxes.

- See Add Module for steps.
Customize Module
To customize a module:- Click the Edit Dashboard button to open the dashboard editor.
- Click the ellipsis on the module header to access the menu with the following options:
- Add to Favorites / Remove from Favorite - Add a module to favorites to display a star in its header. When you filter to show only favorites, only these starred modules will be visible.
- Update Module Color Header - To change the module header color:
- Select Update Module Color Header to open the color picker.
- Select a color.
- Click outside the color picker to confirm your selection.
- Module Settings (For Quick Signs) - Opens the Configure Quick Sign modal. See Quick Sign Module Settings for information on the modal.
- Remove Module - Removes the module from the dashboard.
Save Dashboard Config
When you have completed your dashboard customizations, click Save Dashboard to save your dashboard configuration settings.Related Information
Overview of Your Docubee Dashboard Overview of the Documents Section Need more help getting set up? Contact us for assistance from our customer support team or register for Office Hours.Was this article helpful?
That’s Great!
Thank you for your feedback
Sorry! We couldn't be helpful
Thank you for your feedback
Feedback sent
We appreciate your effort and will try to fix the article