View our Pricing & Plans for a detailed list and comparison of features available in each plan.
A workflow is a series of specific steps, tasks, or events performed in a sequence to ensure a business process is executed efficiently and effectively.
While a workflow is a master plan of the process, a workflow instance is a workflow occurrence that has run or is running.
Workflows are a vital part of managing complex processes and achieving specific goals/outcomes in an effective and efficient manner.
 Use the horizontal toolbar at the top for the following actions (icons numbered in the above image to match the description below):
 The available task action buttons are:
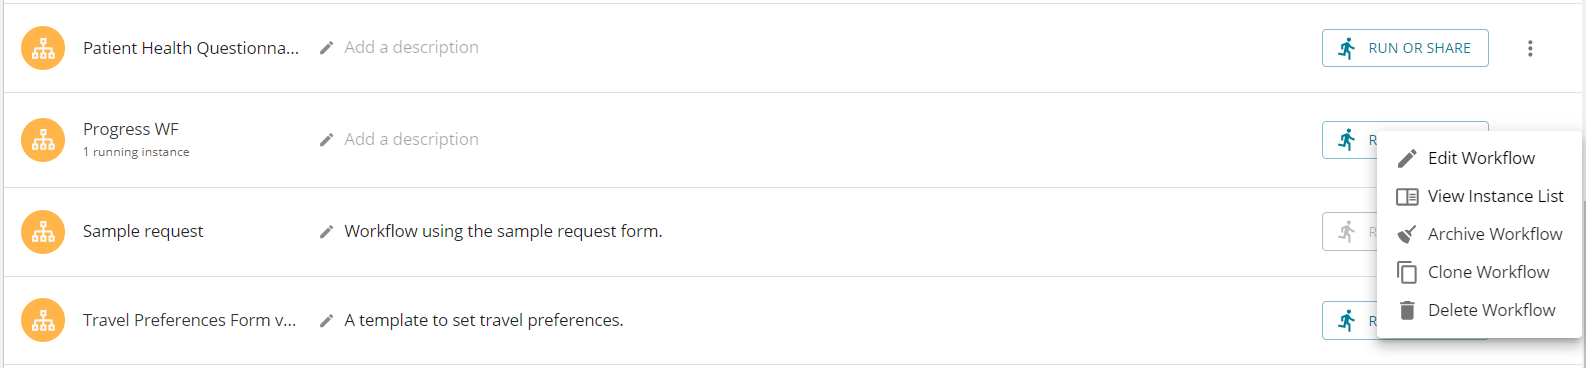 or as cards. In the card view, the pencil icon is for editing the workflow and the view list icon is for viewing the workflow instance list.
 The “more actions” you can perform on a workflow includes:
Before You Begin
Chart your workflow - Analyze your process from start to finish. Have a good understanding and clear picture of the steps, documents, participants, and data involved before you start building the workflow.The Workflow Section
In the left navigation bar, click Workflows to open the Workflows section. Here, you can:- view all your workflows or
- select a workspace from the left sidebar to view its associated workflows.
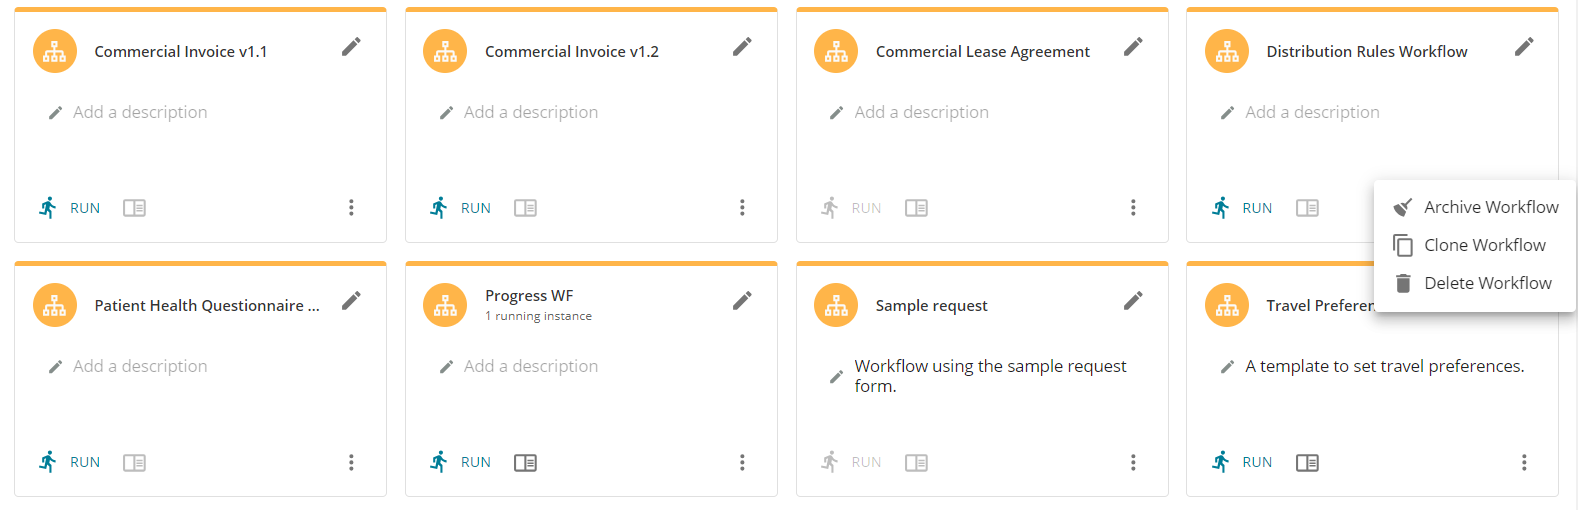
- Card view - Each card is a workflow.
- List view - Each list row is a workflow.
- Show/Hide Archived Workflows - Choose to show or hide archived workflows.
Ways to Start Workflow Creation
When creating workflows you can do any of the following:- start from scratch.
- use an existing workflow from our workflow library and customize it to your requirements.
- import a workflow file. See Export/Import Workflow Model under Horizontal Toolbar for more information.
- duplicate (clone) a workflow. See Clone Workflow under Workflow More Actions for more information.
Create a Workflow
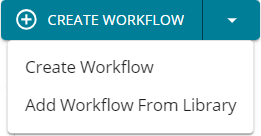
You can create a workflow from scratch. It is good practice to first determine your process steps, data to input, and all other details before creating the workflow. Basically, plan before creating the workflow.- At the upper-right corner click Create Workflow …

- If prompted, select the workspace in which to create the workflow.
- In the Workflow Name modal, enter a name for your workflow and click Continue or Skip. Note: If you choose to skip naming your workflow, it will be named “Untitled Workflow.” However, you can change it at any time in the editor by clicking on the workflow name and entering another name. See Workflow Settings | General Tab for more information.
- The workflow builder opens and you can create your workflow! Note: See Horizontal Toolbar for information on its icons.
- From the right sidebar, click a task to add it to your workflow. It is represented by a rectangle. We recommend your first task be a web form. Note: Tasks are categorized by type. See Types of Tasks for more information. Note: We recommend your first task be a web form to gather some basic identifying information, like name and email address, for use in subsequent tasks. Note: After adding a task to the workflow, notice the tabs in the right side panel that help search, monitor, and manage the workflow: Search Workflow, Workflow Health, and Workflow Participants.
- Click on the task (rectangle) you added in the workflow builder and in the task configuration page that opens you can customize its name, set its properties to your preferences, select a task assignee (to act on it when the workflow executes/runs), and perform any task actions.
- At the upper-left corner, click Return to Workflow Model to return to the workflow builder.
- Click the + button above or below a task to add another task.
- After all the tasks are added to the workflow, click Publish to make it available to workspace members. Note: You have the option to include a note every time you publish. We find that adding a note helps users distinguish between the various changes they’ve made in case they need to revert to previous versions.
Add a Workflow from the Workflow Library
You can add a workflow from the Docubee workflow library and customize it to suit your process. This reduces the time and effort to create a workflow. If your business process is a standard one, explore our workflow library for a workflow template that may suit your needs or can be used as a starting point for customization.- At the upper-right corner click the down arrow next to Create Workflow and select Add Workflow From Library.
- In the Workflow Library read the workflow descriptions and determine the one that best matches your workflow specifications.
- To select a workflow, click on the workflow card or the Use this Workflow button to display the Create Workflow in Workspace modal.
- Of the listed workspace(s), select the one in which to create the workflow and click Deploy Workflow.
- You will be navigated to the selected workspace and the selected workflow is available there for you to use.
- Click the Edit Workflow button (pencil icon) to open it in the workflow builder and customize it to suit your process. Note: Many of our templates come with placeholder content (sample text) for you to customize. Make sure to review the model and replace this information with your unique information.
Horizontal Toolbar
Use the horizontal toolbar at the top for the following actions (icons numbered in the above image to match the description below):
- View Instance List - Displays the in progress, completed, and canceled instances of the workflow. See Workflow Instance List for more information.
- At the upper-right corner, click Edit Workflow to return to the workflow builder.
- Navigate to Start - Returns you to the beginning of the workflow in the workflow builder.
- Search Tasks - Locates a task in the workflow using your search term which can be any data found on the face of the task card/rectangle or a part of it.
- Collapse All Branches - Collapses branches.
- Expand All Branches - Expands branches.
- Workflow Settings (gear icon) - Define your workflow settings. See Workflow Settings for more information.
- Revert Workflow Model - Rolls back to a specified previous version of the workflow.
- Export/Import Workflow Model -
Note: See Export and Import Workflows for more information.
- Exporting a workflow model can be for personal backup purposes or for transferring this model to another group or organization. Note: Exporting the model does not include any information about in progress, completed, or canceled instances of this workflow.
- Imports a previously exported workflow model. Caution: Importing a workflow model will overwrite your existing workflow model.
Task Actions
At the top, below the header, you will find the actions you can perform on tasks. Click on a task to open it and access the task action buttons.
The available task action buttons are:
- Copy Task - Copies the task and prompts you to choose a plus button to indicate where the copied task should be inserted into your workflow. To cancel the copy, click the Cancel Copy Task button.
- Copy Branch - Copies the entire branch (i.e., set of tasks available at the time of this task action) and prompts you to choose a plus button to indicate where the copied branch should be inserted into your workflow. It can only be inserted at an open ended branch and cannot be inserted between two tasks. To abort the copy branch, click the Cancel Copy Branch button.
- Delete Task (trash can icon) - Deletes the task. You are prompted to confirm your intent to delete the task, click Delete Task to proceed with deletion or Cancel to abort. Deleting a task will also delete all tasks that descend from any branch other than the "Continue" branch on the deleted task.
- Add Note - Adds a note to the task. In the Notes modal, click the Add Note button to activate the note editor and enter your note. The note’s content is tagged to the author’s name, email address, date, and time stamp.
Search Workflow, Workflow Health, & Workflow Participants
Search Workflow Easily locate a task in your workflow by searching by its task name or assignee. If more than one task matches your search term, the matching tasks are listed and you can choose the one you want to locate in the workflow. Workflow Health View the health of your workflow as you build it. It will warn you of errors and cannot launch the workflow until the errors are resolved. It will either have:- A green check followed by the message "Your workflow is safe to publish!" indicating you've configured your tasks properly and can publish the workflow.
- A list of tasks that need attention before publishing. To resolve a task, do either of the following:
- In your workflow, click on any task with a light red shade and modify its properties to correct or complete the task configuration.
- In the right side panel, click the pencil icon next to a task on the list to modify it or click the located icon to be navigated to that task in the workflow, and then click on the task to modify it.
Workflow More Actions
The additional actions you can perform on a workflow are presented differently depending on whether you view workflows as a list
or as cards. In the card view, the pencil icon is for editing the workflow and the view list icon is for viewing the workflow instance list.
The “more actions” you can perform on a workflow includes:
- Edit Workflow - Opens the workflow builder where you can modify the workflow. Note: You can search for specific participants or tasks within the workflows.
- View Instance List - Displays the in progress, completed, and canceled instances of the workflow in the In Progress, Completed, Canceled tabs, respectively. See Workflow Instance List for more information.
- Archive Workflow - Hides the workflow. Organize your Workflow section and reduce visual clutter by hiding non-active/less used workflows. No data is lost, it simply files away the workflow until required.
To unarchive a workflow:
- At the upper-right corner click the Show Archived Workflow button to display the previously archived workflows.
- On the workflow to unarchive, open the more actions menu and select Unarchive Workflow.
- Clone Workflow - Duplicates the current workflow. You can modify and manage the new (cloned) workflow separately. It will not clone any of the instances or data associated with the current workflow.
In the Clone Workflow modal:
- Specify the workspace in which to place the cloned workflow and click Clone.
- The cloned workflow will be titled “Copy of <current_workflow _name>”.
- Customize it to suit your process.
- Remember to publish the workflow before running it.
- Delete Workflow - Deletes the current workflow. You will be prompted with a message indicating that deleting the workflow will also delete its associated instances. Confirm deletion by clicking Delete Workflow.
Known Limitations
- When workflow changes are published it will not affect instances that are already in-progress.
- In-progress workflows will follow the workflow model published at the time the instance was started.
- Workflow changes will only affect the instances going forward.
Next Steps
See Run a Workflow and Run Multiple Workflows.Related Information
Select and Configure a Document for a Workflow Task Types of Tasks (Workflows) All About Workflows (Quick Reference) (Includes links to the 4 Workflow Builder Bootcamp webinar series.) Getting Started with the Workflow Builder Download Workflow Documents How to Build a Workflow (Blog) Additional Resources Need more help getting set up? Contact us for assistance from our customer support team or register for Office Hours.Was this article helpful?
That’s Great!
Thank you for your feedback
Sorry! We couldn't be helpful
Thank you for your feedback
Feedback sent
We appreciate your effort and will try to fix the article