View our Pricing & Plans for a detailed list and comparison of features available in each plan.
Using webhooks is an important step in setting up integrations between your apps. If you’re struggling with disjointed processes that require manual document transfers or data imports, consider using webhooks to streamline these tasks.
What is a Webhook?
A webhook is an automated message sent from one app to another when an event happens. For example, if you have set up a webhook in Docubee to send a document to Google Drive after a workflow is completed, then Docubee would send an automatic update to Google Drive to send the document.
Webhooks vs. APIs
Webhooks and APIs are often confused, but there’s a key difference. Webhooks work automatically to send data when a specific event triggers it, whereas APIs require a manual request to pull or make changes to data from another software.
Let’s see how to set up webhooks in Docubee!
This is an example of a payload with timestamps, workflow initiator email, and their name:
 To configure a webhook connection:
A More Technical Look at Webhooks
Webhooks allow you to build integrations into your workflows that subscribe to your webhook event tasks. When a webhook event task is triggered during a workflow, Docubee sends an HTTP POST payload to the webhook’s configured URL, including all the workflow variables at that point in time. Webhooks can be configured at the organization level by either an organization admin or owner. Once the configuration is complete, you can add webhook tasks to your workflows. The webhook will be triggered each time the workflow is run and the webhook event is triggered.What is a Webhook Payload?
A webhook is an automated message sent from an app when a specific event occurs. This message, known as a payload, includes a unique URL, similar to how humans have a unique phone number. Each payload from a workflow webhook event will contain a timestamp and the workflow variables (anything with a property name, the workflow initiator name, and the workflow initiator email) for a specific instance. You can configure document properties to be included in your payload under the Webhook Task Settings inside of the workflow builder.Use Headers in Webhooks
You can configure customer headers for your webhooks in Docubee to contain specific information. HTTP POST payloads that are delivered to your webhook’s configured URL endpoint may contain the following special headers:|
Header |
Description |
content-type |
The media type of the resource. It will always be application/json for these requests. |
ontask-signature |
The HMAC hex digest of the response body. This header will be sent if the webhook is configured with a secret. The HMAC hex digest is generated using the SHA-256 hash function and the secret as the HMAC key. |
Response JSON
{
    "timestamp":"2019-12-17T02:23:56+00:00",
    "wfVariables":{
        "accusoft_solutions_workflowInitiator":"test@test.com",
        "First_Name":"Joe",
        "accusoft_solutions_workflowInitiatorName":"Joe Test"
    }
}
Configure a Webhook
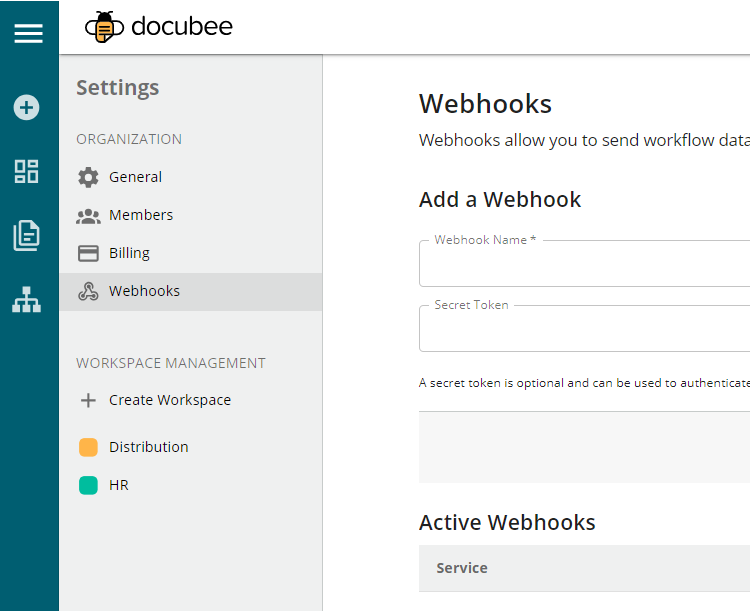
To use webhooks in your Docubee workflow, you have to configure them in the account Settings section. Organization owners and organization admins with the correct webhook permissions enabled will be able to access the Webhooks tab in your organization settings to add a webhook connection.
To configure a webhook connection:
- In Settings, select the Webhooks tab under Organization.
- Webhooks require a few configuration options before you can make use of them:
- Webhook Name – A custom name that you give your webhook connection so that you are able to identify it when adding it to a workflow.
- Webhook URL – The URL of the server that will receive the webhook POST requests.
- It must start with
https://orhttp://
- It must start with
- Optional Secret Token – Set a webhook secret to ensure that POST requests sent to the payload URL are from Docubee. When you set a secret, you’ll receive the ontask-signature header in the webhook POST request. See the section Secure Your Webhooks for more information.
Add Webhooks to Your Workflows
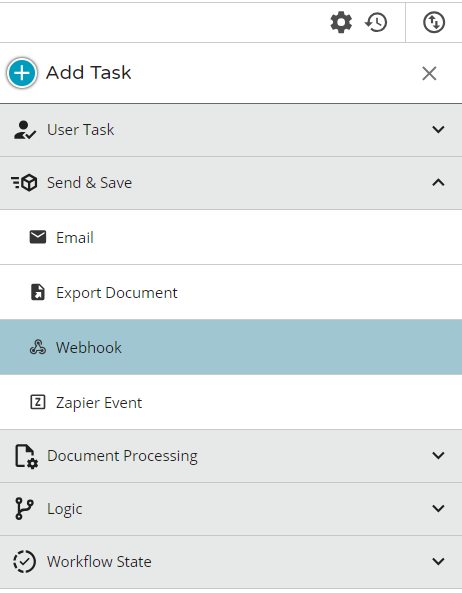
To add a webhook event task to your workflow:- Open the add task selector, go to the Send & Save section and click Webhook.
Note: Anyone who has permission to build workflows will be able to add webhook tasks.
- After you add a webhook task, you will see a right-side panel with configuration options.
Note:
If you are an admin of this organization, you can go into your account settings and configure your webhook.
If you do have at least one webhook connection already configured, you’re ready to move on to the next step.
If you do not have any webhook connections configured yet, depending on your permissions, you may see a message that you need to contact an organization owner or administrator to configure a webhook.

- In the Webhook Configuration tab, from the Select Connection dropdown menu, select the webhook connection to which you want to send the request.
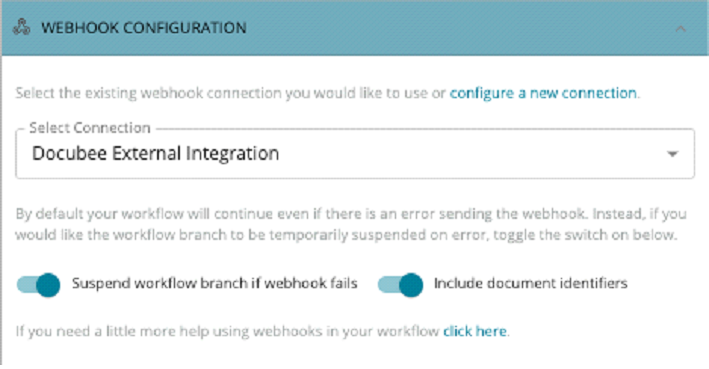
- Use the Suspend workflow branch if webhook fails toggle to choose whether or not to suspend a workflow on a webhook failure. Note: When we send the POST request to a webhook URL, Docubee will try to send the data up to 3 times before suspending the request. By default, if a failure occurs the workflow will still continue on to the next step. If you prefer the workflow to suspend instead and stop proceeding, turn the toggle on.
- Turn on the Include document identifiers toggle to include document properties.
- After configuring these options, you may add any other tasks to your workflow as needed before you publish and run it.
Secure a Webhook
To help ensure the security of your system, we recommend restricting requests to only those originating from Docubee. Setting a secret token for your webhook will allow you to verify the authenticity of the incoming information.Setting Your Secret Token
You will need to set up your secret token when you configure your webhook in Docubee, as well as on your server. When creating your secret token, we recommend using a random string with high entropy. After entering it in the webhook configuration step in Docubee, create an environment variable on your server that stores this token; this can be as simple as running:export SECRET_TOKEN=your_token
Note: We never recommend hard-coding your secret token into your app.
Validating Payloads from Docubee
When you have a secret token configured, Docubee will use it to create a hash signature with each payload. This hash signature is passed along with each request in the headers as ontask-signature. The code snippet below demonstrates a basic server listening for webhook requests with a secret configured. The goal is to compute a hash using your SECRET_TOKEN, and ensure that the hash from Docubee matches. Docubee uses a SHA-256 HMAC base64 digest to compute the hash, so you could do something like this on your server:const express = require('express');
const crypto = require('crypto');
const app = express();
const bodyParser = require('body-parser');
const mySecret = ENV['SECRET_TOKEN'];
const createComparisonSignature = (reqBody) => {
const hmac = crypto.createHmac('sha256', mySecret);
return hmac.update(JSON.stringify(reqBody)).digest('base64');
}
const compareSignatures = (signature, comparisonSignature) => {
const source = Buffer.from(signature);
const comparison = Buffer.from(comparisonSignature);
return crypto.timingSafeEqual(source, comparison);
}
app.post('/webhookTest', bodyParser.json(), (req, res) => {
// Extract the Docubee Generated HMAC Signature from the incoming headers
const signature = req.headers['ontask-signature'];
// Generate a comparison HMAC signature locally using your secret and the incoming request body
const comparisonSignature = createComparisonSignature(req.body);
if (!compareSignatures(signature, comparisonSignature)) {
return res.status(401).send('Mismatched signatures');
} else {
return res.sendStatus(200);
}
});
app.listen(3000, () => console.log('Example app listening'));
Reference
Portions of this article were excerpted from: https://developer.github.com/webhooks/.Related Information
Suspend & Resume Feature (Workflow) Overview of Organizations, Workspaces, and Members Additional Resources Need more help getting set up? Contact us for assistance from our customer support team or register for Office Hours.Was this article helpful?
That’s Great!
Thank you for your feedback
Sorry! We couldn't be helpful
Thank you for your feedback
Feedback sent
We appreciate your effort and will try to fix the article